How to create AIF AX custom service
In this post I will demonstrate the creation of custom service. Custom service is often designed or created for performing the business logic triggered from third party applications. In this post I will demonstrate that how a sales order confirmation can be triggered.
There are multiple scenarios where we need custom services to be implemented and this is one of the simple scenarios .
Basics
1. We need a contract class, contract class is specifically needed when the service deals with multiple parameters or if the parameters passed by third party application are user defined data types or collection types.
2. We need a service class to perform the business logic.
3. We need to create a Service from service node and then add the required service operation to service. Only the methods which were marked as SysEntryPointAttribute{true}, can be exposed to service.
4.Register the service. Service registration is need in case we need enhanced port. (Enhance port is covered in earlier posts)
5. Create a service group with the above service node and deploy the service group.
6. Write C# code to test the service.
Steps to be followed
Create custom service
1. Create contract class

[DataContractAttribute]
class SalesConfirmationContract
{
SalesId salesId;
}
class SalesConfirmationContract
{
SalesId salesId;
}
[DataMemberAttribute('SalesID')]
public SalesId parmSalesId(SalesId _salesId = salesId)
{
salesId = _salesId;
public SalesId parmSalesId(SalesId _salesId = salesId)
{
salesId = _salesId;
return _salesId;
}
}
2. Create service class

public class SalesConfirmationService
{
}
{
}
[SysEntryPointAttribute(true),
AifCollectionTypeAttribute('contract', Types::Class, classStr(SalesConfirmationContract))
]
public void confirmSO(SalesConfirmationContract contract)
{
SalesFormletter SalesFormletter;
SalesTable SalesTable;
SalesId salesId = contract.parmSalesId();
AifCollectionTypeAttribute('contract', Types::Class, classStr(SalesConfirmationContract))
]
public void confirmSO(SalesConfirmationContract contract)
{
SalesFormletter SalesFormletter;
SalesTable SalesTable;
SalesId salesId = contract.parmSalesId();
try
{
ttsBegin;
{
ttsBegin;
SalesFormletter = SalesFormletter::construct(DocumentStatus::Confirmation);
SalesTable.clear();
SalesTable = SalesTable::find(salesId);
SalesFormletter.update(SalesTable,
systemDateGet(),
SalesUpdate::All,
AccountOrder::None,
false,
false);
SalesTable.clear();
SalesTable = SalesTable::find(salesId);
SalesFormletter.update(SalesTable,
systemDateGet(),
SalesUpdate::All,
AccountOrder::None,
false,
false);
ttsCommit;
}
}
catch (Exception::CLRError)
{
throw error(CLRInterop::getLastException().ToString());
}
}
{
throw error(CLRInterop::getLastException().ToString());
}
}
3. Generate incremental CIL.
4. Create new service from service node and add the class to service created on step 3.

5. Right Click the operation node and add the service operation.
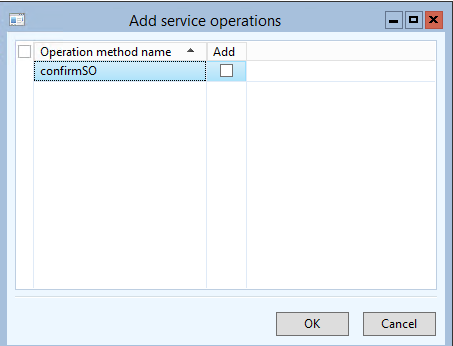
6. Right click on the service and register the service.

7. Create a service group and add the new service to this service group.

8. Right click and deploy the service group.
Test Custom service
1. Copy the WSDL from inbound port.

2. Create new console application in VS.

3. Add service reference.


4. Copy and paste below code.
using System;
using System.Collections.Generic;
using System.Linq;
using System.Text;
using System.Threading.Tasks;
using ConfirmSO.SalesSR;
namespace ConfirmSO
{
class Program
{
static void Main(string[] args)
{
try
{
SalesConfirmClient client = new SalesConfirmClient();
CallContext context = new CallContext();
context.Company = "EAM";
context.Language = "en-au";
SalesConfirmationContract contract = new SalesConfirmationContract();
contract.SalesID = "SO-000001";
client.confirmSO(context, contract);
Console.WriteLine("Sales order confirmed");
Console.ReadLine();
}
catch (Exception e)
{
Console.WriteLine(e.ToString());
Console.ReadLine();
}
}
}
}
using System.Collections.Generic;
using System.Linq;
using System.Text;
using System.Threading.Tasks;
using ConfirmSO.SalesSR;
namespace ConfirmSO
{
class Program
{
static void Main(string[] args)
{
try
{
SalesConfirmClient client = new SalesConfirmClient();
CallContext context = new CallContext();
context.Company = "EAM";
context.Language = "en-au";
SalesConfirmationContract contract = new SalesConfirmationContract();
contract.SalesID = "SO-000001";
client.confirmSO(context, contract);
Console.WriteLine("Sales order confirmed");
Console.ReadLine();
}
catch (Exception e)
{
Console.WriteLine(e.ToString());
Console.ReadLine();
}
}
}
}
5. Build and Run the VS C# code in order to confirm the sales order.
Happy daxing... :)


